Double Chocolate Double Crunch No Bake Tart

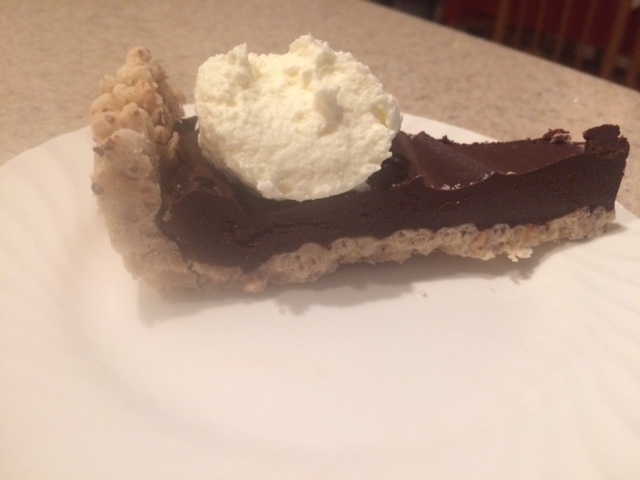
I wanted a dessert I could make well ahead of a dinner, and also one that featured both white and dark chocolate, plus hazelnuts. The results of my brainstorm are a tart shell that remains stable at room temperature for more than a month, and once filled, a tart that can be refrigerated for up to three weeks. The shell is candy like, the filling is a simple ganache which could no doubt be gussied up with liqueur or other flavoring or decorated with raspberries or strawberries. I’m going to give you a range for the crust ingredients because you might want to make tartlets or cookies with the extra and you might like a thicker crust or your pan might be 9 or 10 inches in diameter. One issue I had when cutting the tart (8″ serves 12) is that when the crust is thinner (as in photo above) the side can break off. This didn’t happen all the time, but it did happen, and I haven’t figured out how to fix it other than making a thicker crust which to me is not as aesthetically appealing. (Update: the last time I made this I put the crust only on the bottom of the springform pan, using 2 ounces each of chopped hazelnuts and crisp rice, plus 5 ounces of white chocolate. I expect to be able to run a knife around the perimeter of the springform to release the tart–which is really more like candy. You can pick up a piece like a bon-bon.)

For the crust, coarsely chop 8-10 ounces of toasted, (preferably skinned), hazelnuts and combine with 2-4 ounces of crisp rice cereal. I used Trader Joe’s rice cereal, and I wanted a slightly more salty crust, so I added a few grinds of sea salt. Melt 8-10 ounces of good quality white chocolate (made with cocoa butter) and stir in the nuts and rice crisp. See the first photo.

Press the sticky mixture into a straight-sided springform or tart pan (8″-10″ again, I’m giving you a range) that you have not only greased but also lined the bottom with greased parchment. Use a glass to very firmly press the mixture against the sides and to the bottom of the pan. You have about 25 minutes before the chocolate hardens. This is sticky work, so grease your fingers and be patient.

For the filling, I use a 50/50 ganache of half 72% bittersweet chocolate and half heavy cream. I heat the cream and chopped chocolate in a microwave for one minute, then stir (and perhaps heat again for 15 second intervals) until smooth and well combined. 8-10 ounces of chocolate and cream will fill an 8-10 inch tart shell. Chill the tart before unmolding so that it is firm and easier to handle.

Once the tart is filled it needs to be refrigerated for longer storage, but it’s also fine held at room temperature for 4-6 hours. I think it tastes better when it’s not so cold. I think it could also be frozen, but the components are so stable and easy to make ahead, you don’t need this extra step. Total work time is less than 20 minutes!

Pizza

After more than forty years of baking pizza, I’ve come to believe in these key methods: 1)Let the dough rise overnight in the refrigerator; 2)Use parchment paper under each pizza; 3) Put the cheese UNDER the sauce (thanks, ATK); Bake one pie at a time on a pizza steel at the bottom of a 500 degree oven.

Six 12″ pizzas:

Combine 1 3/4 cups warm water with 2 tsp dry yeast–let sit until yeast dissolves (5-10 minutes) whisk in 2 Tbs. extra virgin olive oil.

In a food processor fitted with the dough blade, combine 600 grams of bread flour or all purpose, plus 25 grams of spelt (or white or regular whole wheat). The high protein bread flour makes the crust chewy and the spelt adds flavor. (To transform all purpose flour into bread flour, add 30 grams of vital wheat gluten and 30 grams of barley malt powder to 540 grams of all purpose) Add 5 grams of salt (a scant teaspoon) and process until blended. With the machine is running, slowly pour in water/yeast/oil mixture, and process until the dough comes together in a ball. Let rest 15 minutes. Process again until the dough is smooth. Place the dough into an oiled bowl and cover, then let it rise in the refrigerator at least 8 hours and up to 24.

Place the baking steel on the bottom rack or on the bottom of the oven itself. Remove the other racks from the oven so it’s easy to maneuver. Preheat to 500 at least 1/2 hour before you start to bake.

An hour or so before you want to bake, remove the bowl from the refrigerator and cut the dough into six pieces. Press or roll out each pizza on a piece of parchment paper dusted with flour. (Just using a pizza peel to move the pizzas into the oven was too tricky for me; sometimes the dough stuck to the surface and wouldn’t slide.) I press, then let the dough rest for 5-10 minutes, then use a rolling pin to get the dough thin enough, to roughly 12″ rounds or rectangles. (I tried the “gentle” method of cutting the dough into six individual pieces for the refrigerator rise and then patting and pulling in order not to deflate the air bubbles, but my recipe and method produce almost as many air bubbles with much less fuss, and anyway I prefer that the middle of the pizza have a thin crust.) Cover the pizza dough with shredded Italian cheese. (I like Trader Joe’s Quattro Formaggio which contains shredded fontina, asiago, parmesan and provolone–all more flavorful than mozzarella–and without cellulose, a wood pulp fiber added to other packaged shredded cheeses to prevent clumping.) 12 ounces will cover six pizzas, although you could use more.

Then use an angled spatula to spread marinara sauce on each pizza, yes, OVER the cheese in the center, leaving a 1/2 inch to one inch rim. This gives the cheese a chance to bond to the dough (including the edges) and prevents it from slipping off when you take a bite after it is baked. Putting the sauce on top also allows some of the moisture in the marinara to evaporate, intensifying the flavor. You could put basil leaves under the sauce, too (as in the photo above) but I think fresh basil tastes better scattered on the pizza AFTER baking. Use between 24 and 28 ounces of sauce on the six pizzas. You can also let the pizzas rise for another 15-20 minutes, or you can start baking as soon as they all have been covered with cheese and sauce. The extra rise makes makes the edges (especially) more puffy.

Since you’ve put each pizza on a separate piece of parchment, it’s easy to slide each one onto the baking steel into the preheated 500 degree oven. A pizza peel or a rimless baking sheet works well to slide the pizzas on and off the steel. Bake about 11-13 minutes–the edges should be brown, and if you lift the bottom of the pizza, the bottom should be brown too, although it won’t be as brown as the edges. The other pizzas will be fine waiting to bake.

A pizza steel will last forever. Since I put one in my convection oven, I no longer have to rotate cookie sheets when baking cookies to avoid burning the ones on the bottom rack. I leave the steel in the oven, because it’s heavy and also because it makes the oven more efficient by holding heat.

Better (and Very Easy) Sour Cream Chocolate Cake

I used to work in a restaurant that sold Maida Heatter’s Sour Cream Chocolate Cake, always sitting on the bar so that everyone could see it. It was the most popular dessert and I liked it too. Years later I created my own version of it–made in a food processor–using less sugar and far less effort. The batter takes 10 minutes to put together, the cake takes 20 minutes to bake (while you clean the kitchen and make the frosting) and the whole thing is ready in an hour. If you know anyone who uses cake mixes, please give them this recipe. I can’t guarantee results if the ingredients are not weighed, though, so maybe also give them a scale.

Better Sour Cream Chocolate Cake

All ingredients should be room temperature.

1 ½ sticks of unsalted butter  (6 ounces)

¾ cup sugar (5 ounces, 140 grams) (I whir Turbinado in a blender until it’s finely ground and sometimes use that for extra flavor.)

2 large eggs

¾ cup sour cream (5 ounces) 

2 tsp vanilla extract

1 ¼ cups all purpose flour (5.3 ounces, 150 grams) Bleached flour makes an even more tender cake.

1/3 cup unsweetened cocoa (1.5 ounce)  (You can use all natural, half natural and half alkaline-treated if you like, or all alkaline-treated (“Dutched”).

1 tsp baking powder

½ tsp baking soda

¼ tsp salt

roasted cocoa nibs, optional, 2 Tbs., for sprinkling on unbaked cake

Cream butter and sugar in food processor (or mixer) until fluffy, about a minute. Add  eggs, then sour cream and vanilla, process briefly after each addition until smooth, scraping the sides often. Then add dry ingredients which have been sifted or whisked together, and process again for 30 seconds. Spoon into two greased and floured (I use Baker’s Joy) 8” pans and level the batter. Bake for about 17-20 minutes at 350 degrees or until tester comes out clean and cake just begins to shrink from the pan. (In my convection oven, the cakes are done at 17 minutes.) Let cool for a few minutes, then turn out on racks.

Sprinkle on cocoa nibs (1 Tbs. per layer) before baking or frost with sour cream ganache (or both):  Whisk 9 ounces of room temperature sour cream together with 9 ounces of melted chocolate (any kind; I use 72%; fewer cocoa solids create a softer frosting and sweeter taste.) If you use 72% and want the frosting sweeter, you can add a bit of stevia. To melt chopped chocolate in microwave, use high power for one minute, then stir and heat again at 15 second intervals until stirring melts all of the chocolate. Flavor with a few teaspoons of brandy or liqueur if you like. Or fill the cake with apricot or raspberry or blackcurrant jam, then frost.

Cake tastes best room temperature but keeps best in the refrigerator. It tastes especially delicious with lightly sweetened whipped cream.

Makes twelve 3” cupcakes. Fill paper liner between 2/3 and ¾. Bake at 350 for 15 minutes.

Gluten-free variation with chestnut flour:

Whir all dry ingredients except sugar and nibs in blender with 1/4 tsp xanthan gum as a first step, then dump into a bowl and follow recipe as written. Reduce sugar to 3.5 ounces to compensate for the sweetness of the chestnut flour.