Like many things I make, this batch of candy resulted from my own craving. Why buy caramels if they are likely to be too sweet, stale, expensive, or all three? These scratched the itch and were easy, even without a candy thermometer.
1 pint heavy cream
2 1/2 cups sugar
1 cup corn syrup
1/2 tsp salt
10 ounces bittersweet chocolate (I used 75%, you could make them more bitter by using a higher cocoa percentage.)
I stick unsalted butter
1 tsp. vanilla extract
flaky sea salt for garnish
Line an 8×13 (or so) pan with parchment paper. (The smaller the pan, the higher the caramels.) Spray the parchment with cooking spray.
Whisking constantly, simmer the cream, sugar, corn syrup and salt until it thickens slightly and reaches 220 degrees, 10-15 minutes.. Off the heat, whisk in the butter and chocolate. Cook (and whisk) until it reaches “firm ball” stage (240 degrees)–this may take 20 more minutes. Be patient. You’ll see the mixture thicken yet again; the simmering bubbles will be large. To test, put a bit on a cold plate and see if it holds its shape. Stir in the vanilla and take off the heat.
Pour into the prepared pan and sprinkle the top with Maldon or other flaky salt, as desired. Allow to sit 8-12 hours in a cool place. Unmold onto cutting board and cut into squares or rectangles, then wrap each piece in parchment or wax paper.
When I was teaching food writing at Westminster College, each of the students (some of whom were pretty good cooks) and I went around the circle and shared a cooking tip. Sharp knives, vinaigrette, tearing lettuce, home brew kombucha, etc.
My tip was that every one who likes to cook and bake should learn to temper chocolate. One student said, “they make it sound complicated” to which I responded, “yes, and that’s why people who actually have mastered far more complex tasks avoid it.” In fact, I read a cook book by Giada de Laurentiis which contained a recipe for fig and almond butter-filled chocolate bites. Her recipe called for adding oil to chocolate chips and then dipping the balls in this– then storing the bites in the refrigerator. Why on earth melt chips, which are designed not to melt, and then add OIL? Why not temper the chocolate so that the bon bons don’t have a finger-marking gooey smear? (For that matter, why do home candy makers settle for chocolate without cocoa butter, made with palm or coconut oil? It’s easier to use, but not that much easier, and the flavor suffers. Real chocolate, as opposed to “coating products,” tastes better. Plus, the snap you get from tempered chocolate is better.)
So, a few weekends ago I had friends over to make cookies. One of the cookies (Elise Lebkuchen) is covered in dark chocolate. I wanted my friends to see how easy it is to temper chocolate, the difference it makes in the finished product, and the way in which this one technique opens the door to more professional candy and cookie baking.
I usually use 72% bittersweet. Melt as much as you can work with in 15 minutes–start with eight ounces until you get the hang of it. You can easily remelt and retemper what’s leftover. Imagine dried fruit soaked in eau de vie or brandy, combined perhaps with roasted nuts, becoming quick little chocolate clusters. You can soak the cherries in Kirsch overnight (or fast soak in the microwave) and then dry them on a paper towel. Or prunes soaked in Armagnac brandy. Pistachios and apricots snipped into sixths. You get the idea–you can also just use nuts OR dried fruit and if you will be using the treats within a few hours, you can use fresh fruit, say raspberries or blackberries. You can also drizzle the tempered chocolate over cookies or make lacy designs with it, say by putting the tempered chocolate into a plastic bag, snipping off a triangle at the end, and writing “Happy Birthday” on a piece of foil or silicone liner. Once it has hardened, place it on a cake or plate.
The amount of cacao in the chocolate determines the tempering temperature–milk chocolate requires a lower temperature and white chocolate, which is just cocoa butter and sugar, even lower. In any case, tempered chocolate will harden within a minute or two when in contact with the cookie or dried fruit or… Steven Hill, a chef at 209 1/2 in DC in 1981, taught me to make chocolate ganache-filled candy. He piped the ganache into little mounds or pieces, froze them, and then dipped the pieces into tempered chocolate. We offered them to diners as a special “friandise” at holiday time. I ate a lot of them.
Because I’m impatient, I melt chocolate in the microwave instead of the safer way, in a double boiler over simmering water. In the microwave, you can zap the chopped chocolate at one minute, then 15 second intervals. Take the temperature with an instant read thermometer after each minute and stir well. You want the bittersweet (72% cacao) chocolate to reach 120 degrees Fahrenheit, and then cool down to 80 before you dip or coat with it. (Perfect tempering demands you bring it back up to 88 degrees, but I don’t do this. ) Don’t panic if the thermometer reaches a few degrees more or less. Depending on the temperature of the room, the cooling can take 15-25 minutes. To speed the process, stir in some finely chopped chocolate and stir until it, too, melts. You can put the bowl in a cool place (but take care to keep stirring so the sides don’t congeal before the rest).Your tempered chocolate might have a few streaks or not be absolutely shiny, but here, the perfect is the enemy of the good. And if you mess up, you can always remelt the chocolate or use it for brownies.. The Valrhona website says that holding the chocolate for a longer time at just above (88-89) the dipping temperature makes better coating. I’ve never done this, but now that I have an induction range, I might try. But if it turns out to be hassle, I’ll be satisfied with “good enough” tempering.
When the chocolate has cooled to 80 degrees, dump in the nuts and/or fruit, stir well to coat, and working fast, scoop teaspoons or tablespoons of the mixture onto parchment, silicone, foil, or a flat plate. I suggest starting with 8 ounces of chocolate so you can finish making the clumps before the chocolate hardens. When the chocolate is too stiff to work with (say when you see it harden on your fingers or on the spoon), then let it cool and begin the tempering process all over again.
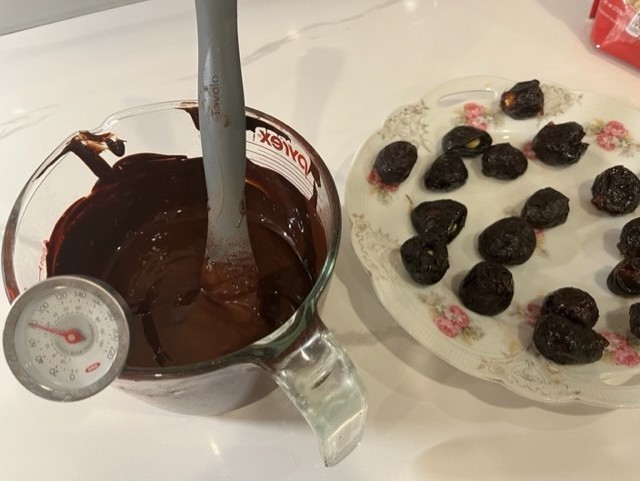
The bon bons in the photo are prunes soaked in whisky (that’s what I had) for a few days and then filled with a roasted hazelnut, just before I dipped them with a fork. They don’t need to be refrigerated. They remain edible a long time, because each of the components is shelf stable. Be sure to dry the fruit well on a paper towel and let the pieces sit on the counter a few hours before coating in chocolate so that your chocolate doesn’t get alcohol in it. You can use a fork to dip, or buy a special tool that looks like a loop. Remember that you can remelt and reuse any chocolate. If you are a perfectionist, see the Valrhona website for more instruction.
But why not make some holiday chocolates right now? Trust me, you will reach “good enough” skill level on your first or second try.