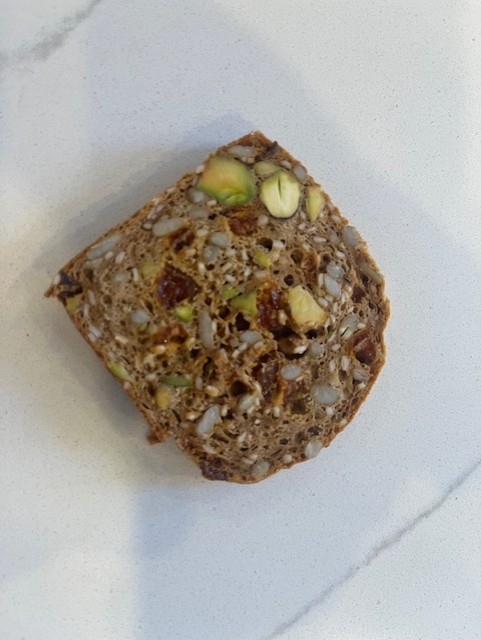
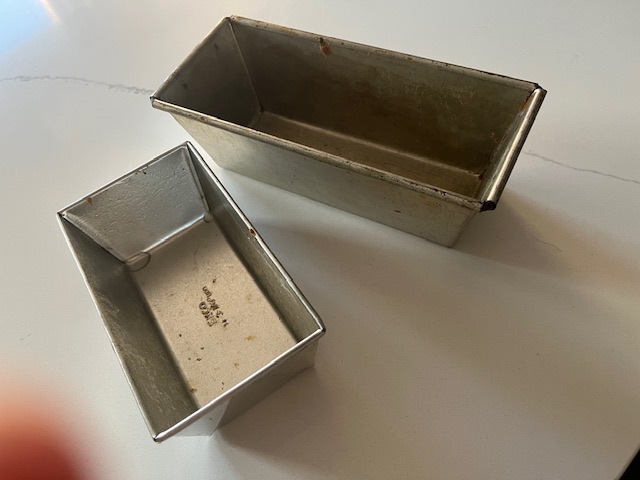
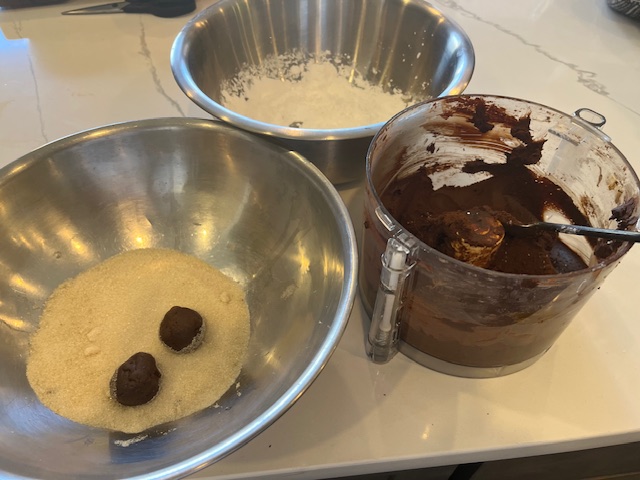
We were in Wolfville, Nova Scotia, without a kitchen, and wanted to try local cheeses. The cheese shop was out of baguettes, so we bought crackers. A 100 gram (3.5 ounces) package of “Fine Cheese Company Toasts” cost about $10. They were good despite being due to “expire” in December 2025. At home, I used the ingredient list to make my version, approximately using a small fois gras loaf pan, and two mini loaf pans. The first step is a simple quick bread dough. Bake it in pans or a pan, then cool and freeze. When frozen hard, slice thinly, and bake the slices again on low to make them crisp.
These are so delicious we ate them like cookies. but cheese complements them with creamy fat. In my quest for better nutrition, I made the crackers high fiber, whole grain and gluten free.
For about 70 thin slices… 1.5 inch squares, I baked the loaves in three small pans, but you could bake (longer) in a full size pan and cut the slices into quarters. Next time I’ll weigh the finished slices to compute how much a batch “is worth”–my guesstimate is 600 grams, or $60 worth of FRESH crackers.
2 cups buttermilk (I added buttermilk powder to regular milk)
3 Tbs. sugar
2 Tbs. psyllium husk
1 cup (140 grams) sprouted buckwheat flour
1 tsp. baking soda
1/2 tsp sea salt
2/3 cup sesame seeds (I used unhulled because that’s what I had.)
2/3 cup raw sunflower seeds
2/3 cup raw pistachios, whole is fine
2/3 cup finely chopped dried apricot (I used Trader Joe’s “soft apricot”)
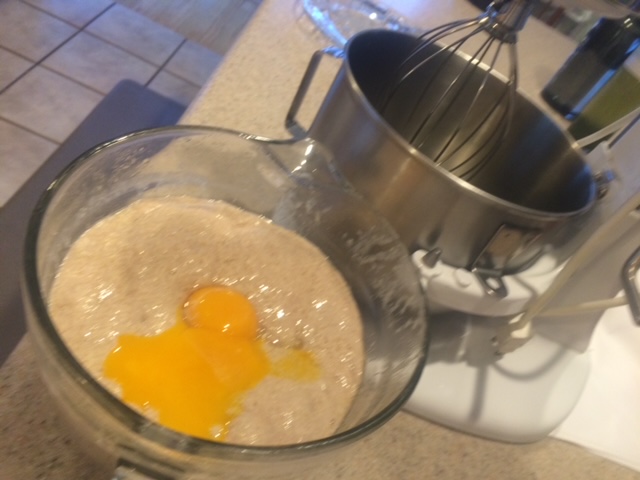
Whisk buttermilk with sugar, salt, and psyllium husk. The husk adds fiber and opens up the crumb, making the final product less dense and quicker to crisp. (I did not add oil because it was the last ingredient on the package list, meaning there was very little of it anyway. )Whisk in flour and baking soda, then stir in the seeds, nuts, and fruit. Spoon into loaf pans that have been greased and floured (I use baking spray with flour–for someone with celiac disease, use a parchment sling in the pan instead.) Bake at 350 (my convection oven reduces that to 325) for about 25 minutes for small pans, maybe 45 for one large loaf pan. Loaves are done when a pick comes out clean. Unmold after a few minutes to finish cooling on a rack. When completely cool, wrap well and freeze.
When you are ready to bake the slices (you don’t have to re-bake the entire batch at once, especially if you use small pans), use a sharp knife or cleaver to cut 1/8 inch slices and place on a baking sheet (no parchment necessary). Bake at 300 degrees (I used convection again, because the fan keeps the heat even) for about 25 minutes. Slices should be light golden brown and crisp. They crisp further upon cooling.
Other flavor combinations: cherry and hazelnut, fig and almond, cranberry and pecan.
We discovered this dessert at the JG Grill (now named something else and with a different chef) in the St. Regis resort in Deer Valley, Utah, reachable by funicular so getting there felt like an adventure. The dessert hits various flavor and texture notes and the components can be made separately over several weeks. Of course Salted Caramel Ice Cream, Hot Fudge Sauce, and Caramel Corn can also be purchased, but they are not difficult to make. For each component, adjust the salt to your taste.
Salted Caramel Ice Cream
For the ice cream (you will need a powerful blender), I use (about) 8 ounces of raw cashews, 3/4 cup of sugar, 3 cups of half and half, 2 TBS of cream cheese, 1/2 tsp guar gum. Simmer the cashews in filtered, lightly salted water until soft, about 1/2 hour; they give the ice cream more body (and protein). Let cool and drain. Burn the sugar into caramel in a medium saucepan until it’s the color of mahogany. Remove from heat. Add two cups of half and half and let the mixture sit over very low heat until the caramel is dissolved, stirring now and then. This might take 30 minutes. Whisk in room temperature cream cheese. (It’s OK if it’s a bit lumpy.) Add 1/2 tsp. salt and 1 tsp. vanilla and 1/2 tsp. guar gum. (You can also emulsify the ice cream with six egg yolks, cooked into a custard with the cream and caramel, and leave out the guar gum and the cream cheese.) Drain the cashews and put them in a blender along with the last cup of half and half; blend on high until perfectly smooth. Add the caramel mixture and blend again until smooth. Taste to see if it needs more salt. Chill until very cold. Then churn in an ice cream maker, and pack into containers–this makes 1 1/2 quarts. Remove container from freezer 15 minutes before scooping the ice cream. Lasts at least a month in the freezer.
Caramel Corn
For the caramel corn, you’ll need 3 quarts of popped corn (made from about 1/3 cup raw kernels). I use a hot air popcorn maker. There are different ways to make caramel coating for the corn. Here’s one, adapted from the NYT: combine 1/2 cup corn syrup, maple syrup, or other invert sugar (agave, honey, golden syrup, brown rice syrup, etc.), with 1/3 cup sugar, 2 TBS molasses, and 6 TBS of butter in a medium saucepan. Simmer for about 8 minutes or until it thickens. Add 1/2 tsp salt, 1 tsp vanilla extract, and 1/4 tsp baking soda. With utensils, combine the hot caramel (which will burn your bare hands) and the popped corn as completely as possible. Spread the corn on parchment-or silicone-covered cookie sheets and bake (convect is best) at 300 for about half an hour, stirring occasionally. The corn will crisp upon cooling and it stays crisp for about a week, if kept air tight.
Hot Fudge Sauce
For the hot fudge, combine 1 cup heavy cream, half and half, or evaporated milk; 2 TBS butter; and 1/2 cup sugar; and 1 TBS molasses; 1/2 tsp salt and simmer until smooth. Whisk in 1/2 cup Dutch process cocoa, turn off heat, then whisk in 4 ounces chopped bittersweet chocolate. This reheats well in a microwave or water bath and lasts several weeks (if you can avoid taking a spoon and just eating it).
To serve, place a few tablespoons of warm fudge sauce into the bottom of coupes or bowls, add scoops of ice cream, then top with caramel corn (and more fudge sauce and whipped cream if you like). At the JG Grill, the fudge sauce was on the bottom of the bowl, a surprise that encouraged scraping.
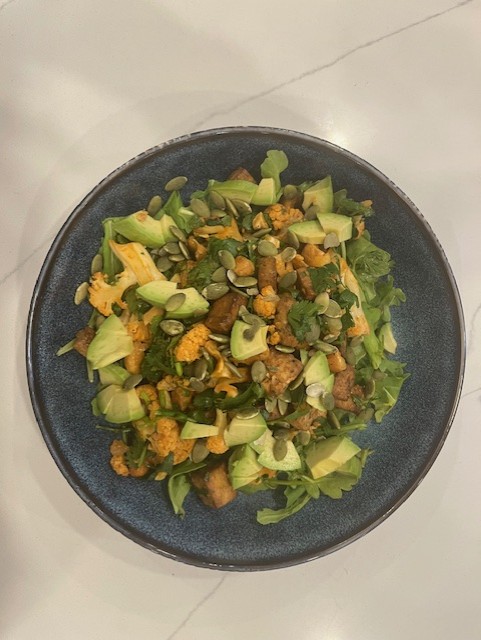
I’ve been making variations of this dish since an episode of Milk Street featured roasted cauliflower steaks topped with a garlic, lime, cilantro and cashew sauce. Calling a vegetable a “steak” lends it a certain gravitas, but let’s be real. Guests did not eat the spine of the vegetable, so the “steaks” were wasteful, requiring two cauliflower heads to serve four people. Moreover, the original dish is protein-poor, with only cashews for protein; it required a half can of adobe peppers in sauce (look at the ingredients-ugh), and it called for a lot of oil.
Over the years my version of the dish has evolved into a more frugal, more satisfying, and easier main dish salad. I roast the tofu (marinated in soy and balsamic, lightly coated in oil) at the same time (different sheet pan) as the cauliflower pieces tossed with hot pepper flakes, salt, black pepper, smoked paprika and oil. Yes, to get a good char on cauliflower the pieces should be flat, but that’s not the best part. That honor goes to the lime-garlic-cilantro salsa. (Don’t bother making this if you don’t like cilantro.) Fresh avocado provides a contrast in textures and more nutrition. Roasted tofu gives it protein staying power. Pumpkin seeds add even more protein.
1 head cauliflower, sliced and pieced
1 lb of firm tofu, drained, pressed, and marinated in 2/3 soy sauce and 1/2 balsamic vinegar.
about 3 tablespoons of vegetable oil–I used avocado
salt, smoked paprika, black pepper, hot pepper flakes
I bunch cilantro, chopped very coarsely
3 fat cloves of garlic, grated
5 or 6 limes, juiced with some rind grated too if you like
6 ounces of roasted cashews, coarsely chopped
2-4 avocados, diced
pumpkin seeds, optional
Press, cube, and marinate the tofu.
Coat the cauliflower in oil, salt, smoked paprika, black pepper and hot pepper flakes. Start with 1 tsp sea salt and 1 tsp smoked paprika.
Photo above is of the two pans before going into the oven. Contents will shrink a bit during roasting. Roast tofu and cauliflower on separate sheet pans in a hot–400 degree–oven, switching pans half way through and stirring if needed. Both should be done after 25 minutes, but ovens vary. The cauliflower should be tender all the way through and crisp-ish in some places. The tofu should be a bit crusty on the outside.
While cauliflower and tofu are roasting, make the salsa: Juice the limes and grate the garlic into the juice. This will tame the raw garlic flavor.
Chop the cilantro and toss with everything else. Dice the avocados just before putting the salad together. (Or, more trouble, blanch avocados before cutting to disable the enzyme that turns the flesh brown.) Add pumpkin seeds for even more protein and texture. Taste for seasoning–it might need more lime or salt or pepper. I store the salad in the refrigerator with everything except the avocados, and it tastes fine the next day or even the one after that. But best at room temperature. We serve this on a bed of arugula.
If you love pecan pie, but dislike sugary-gummy filling, try this tart. The frozen puff pastry is a time saver. A layer of unsweetened chocolate cuts sweetness and also gives the tart enough body to eat out of hand, like a cookie. Serves 10-12.
Prepare tart pastry:
Use ½ lb. defrosted but still cold butter puff pastry (half of one Trader Joe’s package; Dufour comes in a 14 ounce package, which means your tart will be slightly smaller). With a bit of flour, roll out more thinly to a larger rectangle, making the new rectangle approximately two inches longer and two inches wider than the original. Keep the pastry on parchment (re-use the one it came in but turn the pastry so it fits).
With a knife, score (don’t cut through) a smaller rectangle, creating a ¾ inch-1 inch rim for the tart. Prick the middle all over with a fork. I have in the past taken the trouble to blind bake with pie weights, but it’s not worth it. If the pastry puffs, just prick with a fork or press down with your fingers. You can also do this after you take it out of the oven so you don’t burn yourself. The weight of the filling compresses the pastry.
Bake 15 min at 375 on bottom rack of oven. Since ovens vary so much, keep an eye on it. You want the bottom of the pastry darker than the rest, and the top lightly golden.
While pastry is baking, make the caramel custard filling:
In a small saucepan, whisk 2 egg yolks, 1/4 cup golden or corn or maple syrup, ½ cup sugar, 1 Tbs. molasses, (or 1/2 cup brown sugar, which is just sugar +molasses), 3 Tbs. butter, ¼ cup heavy cream, ½ tsp salt (if butter is unsalted). Whisk over medium low heat until slightly thickened, about 4 minutes. Add 1 tsp. vanilla extract or 1 Tbs. bourbon. Taste and add a bit more salt if you like.
Take pastry out of oven when very lightly golden; at this point you can also let it sit until you are ready to resume.
Scatter pricked part of pastry with 3 ounces finely chopped unsweetened or 85% or more cocoa content bittersweet chocolate. The chocolate makes the pastry more firm at room temperature and it also counteracts the sweetness of the caramel. You can leave it out for a more traditional pecan tart. The photo below was taken before pouring the caramel and baking for a second time. You’ll see the chocolate melting below the pecans.
Cover with 6-7 ounces pecan halves. They can be arranged in a pattern or scattered.
Pour the prepared filling over the center part of the tart with pecans (and chocolate, if using). If the filling is lumpy, pour through a sieve. Don’t use all the filling if it will run over the edges of the tart.
Bake again at 350 on bottom rack for 15-20 minutes or until filling is bubbling and looks drier and translucent (not necessarily in the middle) and the pastry is darker golden brown. Let cool 30 minutes before serving with whipped cream. The tart stays edible at room temperature for 3 days. It can be warmed a bit for serving, or eaten out of hand at room temperature like a cookie bar.
This is a salad I’ve been making since 1980, when we served it at 209 1/2. I never get tired of it, and I haven’t seen on other restaurant menus. The combination is bright, fresh, salty, creamy, crunchy, slightly sweet, with just the right amount of acid, provided by vinegar and citrus. But it also contains significant protein, from the three components.
Start by chopping half a red onion. Place the onion in a bowl and add 1/4 cup apple cider or red wine vinegar, a tablespoon of maple syrup, a teaspoon of salt and a teaspoon of pepper. This will quick pickle the onion, muting its bite and enhancing its flavor. Meanwhile, boil a pound of cleaned green beans in salted water–cook until they are softer than you usually make them; in other words, you want them not to resist your bite but to absorb the flavors of the salad. Start testing at four minutes–it might take six minutes. In our fervor not to overcook green vegetables, we overlook the instances when “crisp” is not desirable. Put the drained, warm, green beans in the bowl with the pickled onions. Toast a cup of walnut pieces or halves until fragrant (try 7 minutes at 350 degrees) and add, with about 8 ounces of drained feta cheese. (If you want to make the dish vegan you could substitute crumbled tofu, marinated in soy and balsamic, for flavor). If you use feta, it’s worth it to buy imported sheep feta, which has a tang and is creamier than domestic feta made from cow’s milk.
Correct the flavors with fresh lemon juice (try 1/2 lemon) and or a good dash of TruLemon powder, and olive oil, at least 1/3 cup. Add chopped parsley, dill, mint, or tarragon for finesse. The salad lasts at least four days in the refrigerator. You can serve it on a bed of lettuce if you like.
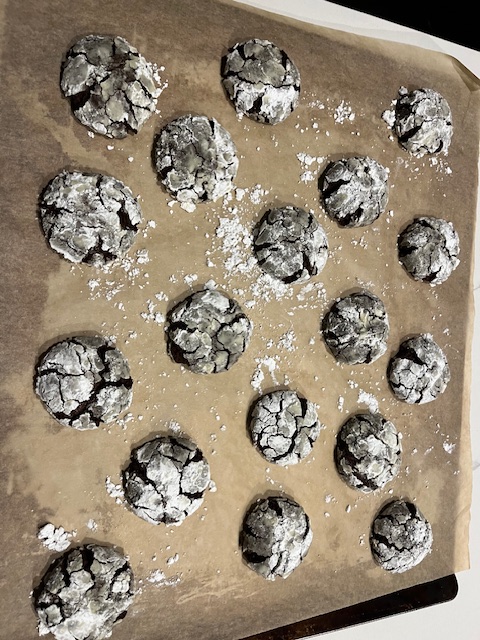
Over the many years I’ve made these cookies, which are sometimes called “crinkle” because of the cracks, I often changed the ingredients, and the cookies were always delicious. I made them gluten-free, using sweet rice flour/tapioca starch or chestnut flour (which is sweet, so you have to cut the sugar). I made them dairy-free, using coconut oil. I made them vegan, using coconut oil and flaxseed eggs (1 Tbs. ground flaxseed mixed with 2.5 Tbs water.) I used Dandy Blend (ground dandelion, chicory, and beetroot) instead of instant coffee. Most recently, when I found a package of organic Ecuadorean cocoa mix (excellent! of course I tasted it) on our apartment building’s thrift table, I subbed that for the cocoa and the sugar. The recipe withstands these changes, I think, because the chocolate is dominant. My go-to is 72% Pound Plus from Trader Joe’s, but I have also used unsweetened chocolate and increased the sugar. You could use sweeter chocolate ( say 55%)and eliminate the sugar from the recipe (but not the molasses, because it adds a certain chew and bitter edge). The percentage refers to the cocoa solids–the higher the number, the less sugar.
Many recipes lurk out there (including, quelle horreur, one that uses boxed cake mix and whipped nondairy topping) and you may even find the cookies in supermarkets. Below is a recipe with variations that I hope won’t disappoint. I think of it as “adult” because of the bitter complexity created by the molasses and coffee. But because the sugar coatings are the first thing your mouth tastes, they initially seem sweeter than they are, and while the texture resembles fudge, the taste does not. Cold, they are chewier than at room temperature.
8 ounces 72% chocolate, chopped and melted (I use the microwave– stir after a minute, letting residual heat melt any chunks, microwave again for 20 seconds if there are many unmelted pieces)
4 ounces butter (one stick) or coconut oil
2 Tbs. molasses
1/2 cup sugar (you can substitute brown sugar for the sugar and molasses–I don’t buy brown sugar because it it is just white sugar with molasses added; if you are using sweeter chocolate (lower cocoa solid number), cut back on the sugar).
2 eggs (or flaxseed variation)
1 cup flour (all purpose, chestnut, g/f blend, etc.) If using sweet rice flour (2/3) and tapioca starch (1/3) they should together weigh 4 ounces. If using chestnut flour, reduce the sugar by half.
1/2 cup unsweetened cocoa powder (alkalinized or not)
2 Tbs. instant coffee or Dandy Blend or espresso powder
2 tsp. baking powder
1/4 tsp salt (omit if using salted butter)
granulated and powdered sugar, for coating
I make the dough in a food processor, but you can also use a mixer.
Cream the fat, sugar, cocoa, coffee. Add the eggs, then the flour and finally the melted chocolate. At this point you can scrape out the dough and turn it into a plastic-wrapped package for chilling and then cutting into squares (which can then easily be rolled into balls), or you can just put the container in the refrigerator for about 30 minutes. Yes, the outside will chill faster than the middle, but I can live with that, with the bit of mess it makes to create balls of dough and roll them first into granulated and then into powdered sugar.
At this point, if your kitchen is warm, you can chill the balls of dough right in the bowl of powdered sugar. If the balls are holding their shape, place them on a parchment-covered cookie sheet toward the top and middle of the oven and bake at 325 for 9-10 minutes. As soon as they are puffed and spread, take them out. (One has to be careful not to overbake recipes with chocolate!) Allow to cool before moving into tins or a plate or eating. (The chocolate will cool and will provide stability.) I’ve kept these for a month in my refrigerator, and I suspect the vegan version will keep even longer because coconut oil is more stable than butter.
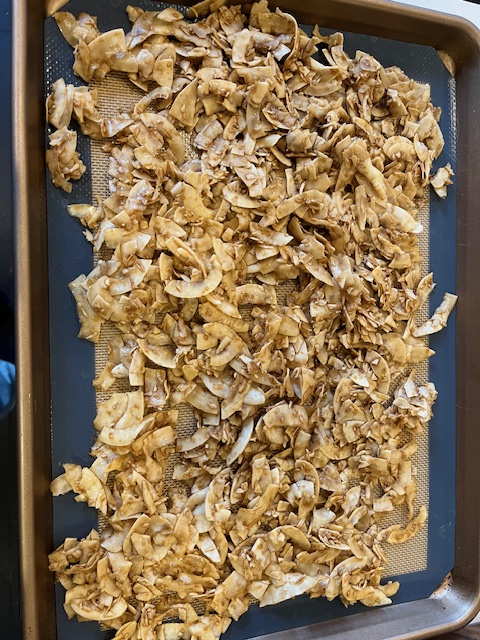
Even if you are not vegetarian, I think you will thank me for this. The chips can be added to sandwiches and salads, or eaten as a snack. I first saw a recipe on the back of a bag of Bob’s Red Mill coconut chips about ten years ago, and have since simplified it. I also discovered that Trader Joe’s brand of chips are larger (and thus better). Basically, you need soy sauce (do not use low sodium), Liquid Smoke, and an invert sugar like maple syrup, agave, date syrup, molasses, golden syrup, corn syrup, and so on (that’s date molasses above)–and a bag of the widest unsweetened raw coconut chips you can find. Liquid Smoke is a shelf stable product composed of water (and a little vinegar and molasses) flavored by smoked wood, for example hickory. Colgin’s is the most common brand–and the least expensive.
Stir together (approximately)1/8 cup each of soy sauce, liquid smoke, and invert sweetener in a bowl. Add 8 ounces of chips and stir occasionally until most of the liquid has been absorbed by the coconut. You can taste it at this point to see if you like the flavor, adjusting if necessary. The chips can sit in the liquid as long as you want, but at least 20 minutes.
Then spread the chips on sheet pan, using a silicone liner or parchment for easy cleanup.
Bake at 325 for 15 minutes or so, stirring occasionally, until the chips are crisp and darker than they were.
The baked chips keep a long time (if you forget you have them).
The chips will become more crisp as they cool, and you can always put them back in the oven for more baking, so it’s best to be conservative when baking. They can go from perfect to burnt very quickly. You might like them with a bit of chew, too.
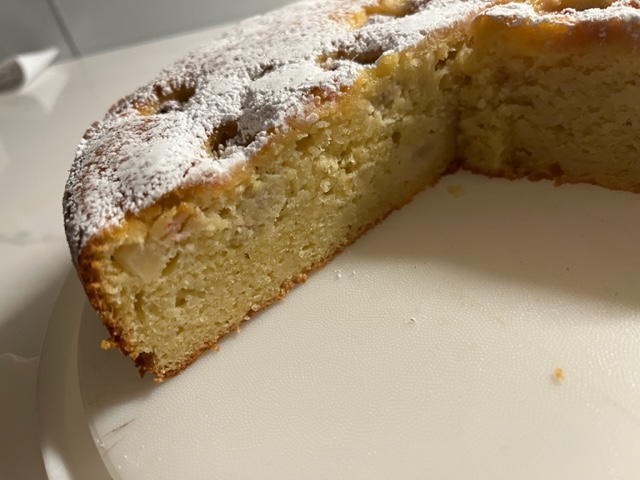
Every fall I make a series of simple pear cakes–because I love pears–especially Bartletts (called Williams in Europe, like the eau de vie) and their season is short and carpe diem, etc. Pears must be used at their point of perfect ripeness; they ripen from the inside out, so if you wait too long, the core might be brown and mushy, and the flavor less intense. It’s a challenge to use or eat them at their perfect point (often only two days, which is why they are sold unripe) when the flesh still provides resistance, but they are at their peak flavor. One way to tell is to smell them–yes, the scent should be intoxicatingly pearish. Another way to tell is by the color–uniformly yellow, no brown spots.
Anyway, a few days ago I wanted to bake a pear cake, but only two of my four Bartlett pears were ready. Two would make too small a cake for what I had in mind, so I thought I would add raspberries. Eureka! The cake was the best version of itself. The raspberries provided brightness and acidity while the chopped pears blended into the batter, adding flavor and moistness.
In the next few days, I bought more pears and made the cake two more times, realizing that this is a flexible recipe, one that not only accommodates the number of pears you might have, but also the absence of a scale, more or less sugar, less butter, an extra egg, gluten-free flour. You can make it by feel and it’ll still be delicious. It might be a bit moister or drier or or, but you’ll still want to eat it.
I cook, and I also bake bread by feel–last weekend I showed a friend how to make challah, and we started by looking at the amount of egg yolks I had frozen (yes, yolks can be frozen–just stir in a bit of sugar–thank you, Rose Levy Beranbaum). Yes, sometimes my results are not picture perfect, but I don’t mind the variance–I learn something each time, and gain confidence, and experience the pleasure of serendipity.
So, this recipe idea makes a two-inch high, 9-inch wide cake. I used a 9″ springform pan, lined the bottom with parchment and sprayed it and the sides with Baker’s Joy. You can make it larger by scaling up the ingredients and baking it in a bundt pan. The insurance for success is beating the egg whites separately–this gives the cake two ways to rise, the chemical and the air-driven.
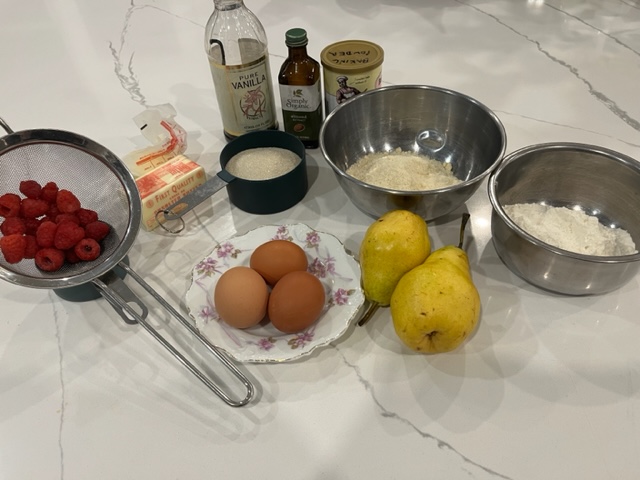
11 Tbs. butter (if you use unsalted, you’ll want to add 1/2 tsp salt later) room temperature (you can use less!–even half a stick)
3/4 cup sugar, divided (if you like your desserts less sweet, try 2/3)
2 Bartlett pears, peeled, cored, and somewhat finely chopped–currant or raisin sized pieces. I dusted the pieces with a bit of Trulemon to keep them white while I prepared the batter. I used between 7 and 10 ounces of peeled, chopped pear, and the cake was fine (albeit slightly different) each time.
1 cup, 4.5 ounces almond flour
1 cup, 4.5 ounces all purpose flour (gluten-free is fine, too–but add 1/4 tsp. of xanthan gum if your mix does not contain it)
1 tsp. baking powder
3 eggs, separated (I used four eggs the last time)
2 Tbs. whole milk yoghurt (or sour cream, or milk if you don’t have the other), only if necessary
1/2 tsp. cream of tartar (OK to leave this out–it stabilizes the egg whites with acid)
1 tsp. vanilla, dash of almond extract (you could try other flavorings, maybe use ground hazelnuts instead of almonds and use hazelnut extract?)
1/2 cup raspberries, about 3 ounces (once, when I didn’t have raspberries, I used cranberries that had been cut in half and sugared overnight)
Powdered sugar, for decoration
Preheat oven to 350–I used convect.
Cream the butter with about 2/3 of the sugar until light. (I did this in a food processor to save my Kitchen Aid mixer for beating the egg whites.) Add the vanilla and almond extract and the egg yolks.
Whisk the almond and AP flour with the baking powder (and salt, if you used unsalted butter). Add to the butter/yolk mixture and blend until smooth. Stir in the chopped pears.
Whip the egg whites with cream of tartar until foamy, then continue beating while adding the last 1/3 of sugar, until stiff but not dry.
If the batter minus the egg whites is too thick (mine was, the first time, although I can imagine cases where it might not be, say if the pears are very large), you’ll need the yoghurt. So if your batter looks recalcitrant, as though you have to beat it hard to make it behave, stir in 2 Tbs yoghurt to loosen it. Then fold in the beaten egg whites in stages until you have an integrated batter. Stir in a few raspberries.
Pour or spoon the batter into the prepared pan and dot the batter with the rest of the raspberries–they will sink below the surface during baking. You want each piece of cake to have at least one raspberry in it, but don’t be tempted to add more; the cake will be too wet, and the raspberries will overpower the pears.
Bake in the center of the oven for 45-50 minutes, checking at 40, but you might need to bake it for 50–I did. Every oven is different. To check the cake for doneness, insert a tester (I use a straightened-out paper clip) close to the middle of the cake. It should come out more or less clean with a few crumbs attached. Remove the cake from the oven to a rack and allow to cool for 10-15 minutes. The cake will shrink from the sides of the pan and maybe fall a tiny bit. Remove the springform sides. You can serve the cake on the springform bottom, or better, once it is completely cool, use a cookie sheet to turn the cake upside-down and remove the bottom and the paper, and then right it on a platter. Use a sieve to dust the top with powdered sugar.
Makes 8 servings. It doesn’t need whipped cream (and I say this as someone who loves whipped cream) and it tastes divine at room temperature, although if you have leftovers, probably best to store them in the refrigerator because the cake is so moist it could mold.
Ever since I’ve been beating egg whites (age 10) I’ve been letting them get to room temperature or warmer because I read in a cookbook or saw on a cooking show (probably Julia Child, although I just watched several YouTube episodes of the French Chef and could not find one where she says this) that they achieve more volume when not cold. Last year, when I was perfecting Japanese cheesecakes (recipe on this site, a few posts ago) I read that the Japanese beat egg whites cold because the air bubbles are smaller, producing a more refined finished product. Since then I’ve been experimenting, and I gotta say I prefer the cold method. 58 years of “wisdom” overturned. More (immediate) volume is not beneficial if it doesn’t ultimately make the product better.
What else have I changed after so many years? I’ve stopped fussing over punctuation, trying to turn off my OCD tendencies, although I still notice typos everywhere, most recently in a book about Paris by Elaine Sciolino, where one paragraph mentions a Klee painting and the next paragraph, about the same painting, calls it a Miro. That was a most interesting typo, because it told me that the name of the painter didn’t matter, either because she couldn’t remember or made up the anecdote.
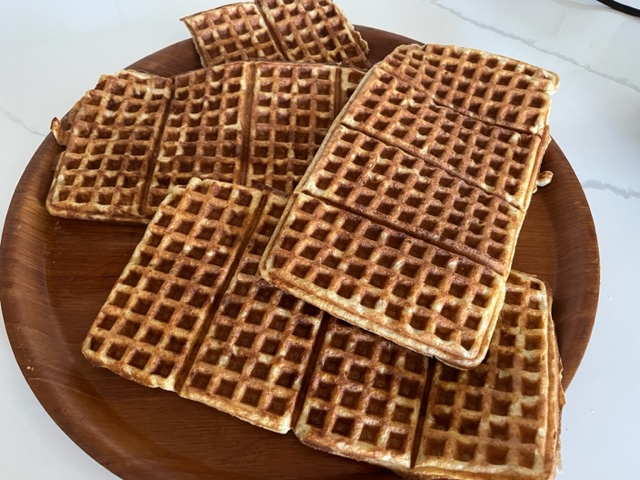
Anyway, here’s a recipe I’ve been fooling with for 20 years or so. The inspiration came from Marion Cunningham’s yeast-raised waffles, but mine are a different thing entirely because they are gluten-free and contain a heaping cup of ground flaxseeds. I have used sourdough starter, but I prefer yeast here. My recipe is forgiving and adaptable. You can substitute non-dairy milk, for instance, or different kinds of flour. I’ll post Cunningham’s recipe below, so you can see how my thinking has changed. I gradually altered the kind of flour, cut the butter, then eliminated gluten entirely. Recall that before chemical leavening, folks used only yeast and egg whites. Note also that there’s no sugar in the recipe–the yeast are fed by the flour. The waffles could also be part of a savory menu. (Aside: The elderly couple I cooked for while in high school liked creamed chipped beef over toast, containing probably a whole day’s sodium. In Switzerland, the hotel where I worked had bundnerfleisch (air dried beef) on the menu. Does anyone in the US still eat chipped beef? )
You may, of course, drench the waffles in maple syrup or cover them with berries.
Flaxseeds, if you don’t know, are wonderfully good for you. They are loaded with protein, fiber, and omega 3 fatty acids, plus vitamins and minerals including thiamine, magnesium, manganese, copper, and zinc. How much healthier can you get?
This recipe makes 5-6 four-part waffles, serving 4-6 people. The baked waffles can be refrigerated (air tight) for a week or frozen for longer storage. Reheat on low (300 F) in a toaster oven.
4 cups whole milk (any kind)
1 Tbs. dry yeast
1 cup buckwheat flour (I use sprouted)
1 tsp salt
1 cup flaxseeds, ground (the golden variety has a milder flavor) (I use a small electric coffee grinder)
6 eggs, separated
1/2 tsp cream of tartar
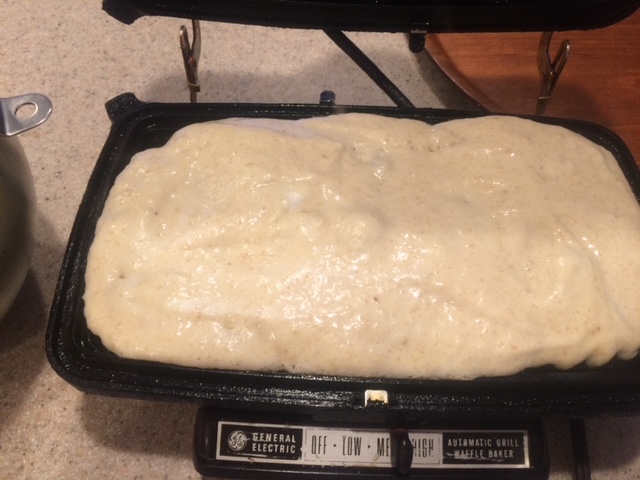
The waffle maker, if you’re wondering, is almost as old as I am, inherited from my mother and still going strong. I spray the plates generously with cooking oil spray, which contributes to the crispness of the waffles. If you want your waffles even crisper, you can add sugar and melted butter to the batter.
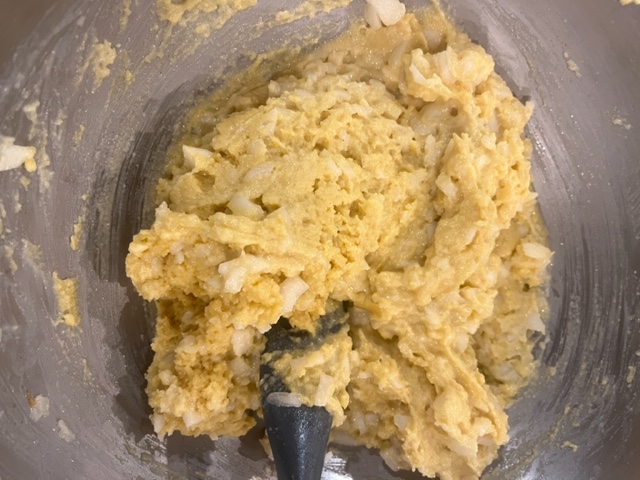
Dissolve the yeast in the milk, then whisk in the buckwheat flour. If you have ascorbic acid (vitamin C), add a pinch, because yeast like it. (Their growth is retarded by salt, so don’t be tempted to add the salt now.) Let the mixture rise for about 45 minutes (or overnight in the refrigerator) until about doubled.
Whisk in the ground flaxseeds, salt, and egg yolks. The batter will immediately thicken–that’s another reason why flaxseeds are good for you–they are a hydrocolloid, high in mucilaginous gum that thickens liquids.
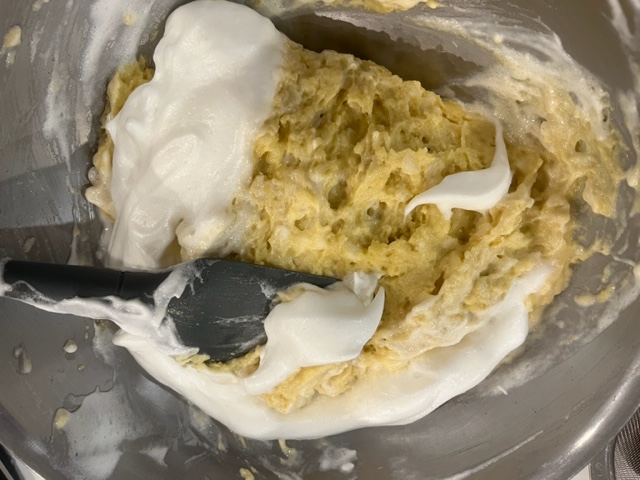
Whip the egg whites with 1/2 tsp cream of tartar (the acid stabilizes them), then fold the whipped egg whites into the flax-buckwheat-egg yolk batter.
I adapted this recipe by Nigella Lawson, making it vegan (and more nutritious) by substituting ground flax seeds for egg white. It’s a dense, seedy loaf (2 lbs.) with complex flavors and slow fermentation, a dark variation of Jim Lahey’s no-knead bread. A forgiving recipe that accepts variations and slices beautifully. I love it with smoked salmon or avocado. You can reduce or alter the whole seeds to your taste. I usually make two smaller (1 lb. each) loaves because they bake faster and I like to freeze one.
Ingredients
20 ounces mix of Guinness stout beer and filtered water. A can of Guinness is just under 15 ounces, but maybe you don’t mind opening two cans, so you can drink the rest. Maybe you have the stuff on tap! I use one can of stout plus 4-5 ounces of water. Place the liquid in a large, deep bowl. You can of course also use another dark/stout beer. If you like your bread without noticeable sweetness, omit the sugar.
whisk in:
2 Tbs. molasses
1 Tbs. sugar
2 Tbs. extra virgin olive oil
1 1/2 tsp. sea salt
Whisk together the dry ingredients:
4 ounces ground flax seeds, either golden or regular (1/2 cup, 114 grams)
300 grams bread flour (about 2.5 cups)
300 grams dark rye flour (2.5 cups)
1/4 tsp. instant yeast
35 grams unsweetened cocoa (I’ve used both Dutch process and non-alkalinized–both work although the color is lighter with the latter.) (3 Tbs.)
2 scant Tbs. caraway seeds
2 scant Tbs. nigella seeds
2 scant Tbs. fennel seeds
Feel free to change the seeds to your taste, even leave them out.
Stir the dry ingredients into the liquid until well mixed. The photo above is the just-mixed dough. Let sit at room temperature, covered, for 16-24 hours. The dough will rise only slightly; the texture will become a bit spongy; you might smell the fermentation. The top will have tiny bubbles. Gently place the dough into a large loaf pan (or two smaller ones) that you have prepared by creating a parchment liner sling and then coating with vegetable oil. At this point if you are not ready to bake, you can refrigerate (retard) the dough. Let rise in the pan another 3-4 hours or so or until the dough has risen again by half. Again, it will not rise much, and you can also refrigerate it at this point. Bring the dough back to room temperature before you bake.
The photo to the left is the dough before placing it in parchment sling/pans. The photo to the right is the dough before baking. When you are ready to bake, preheat oven to 400 degrees–convection works well. Bake for 40 minutes or until internal temperature is 200 degrees. One large loaf will take longer, start testing at 50 minutes. Carefully take the loaves out of the pan with the parchment sling and return to the oven without the sling for another 10 minutes to crisp the crust. Let cool completely before slicing.