Roasted Tofu and Cauliflower Salad with Cilantro, Cashews, and Avocado

I’ve been making variations of this dish since an episode of Milk Street featured roasted cauliflower steaks topped with a garlic, lime, cilantro and cashew sauce. Calling a vegetable a “steak” lends it a certain gravitas, but let’s be real. Guests did not eat the spine of the vegetable, so the “steaks” were wasteful, requiring two cauliflower heads to serve four people. Moreover, the original dish is protein-poor, with only cashews for protein; it required a half can of adobe peppers in sauce (look at the ingredients-ugh), and it called for a lot of oil.

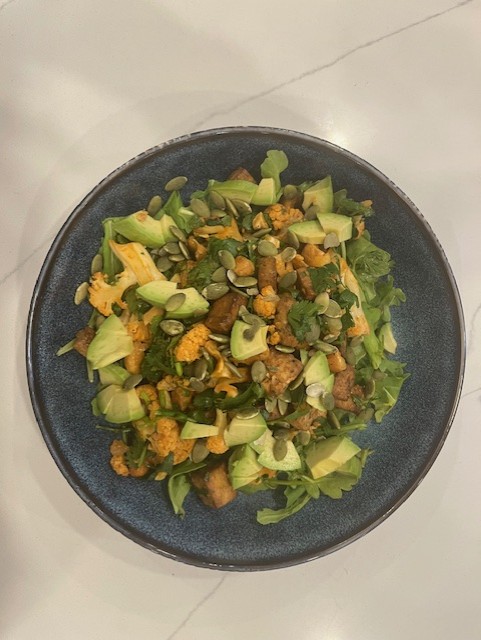
Over the years my version of the dish has evolved into a more frugal, more satisfying, and easier main dish salad. I roast the tofu (marinated in soy and balsamic, lightly coated in oil) at the same time (different sheet pan) as the cauliflower pieces tossed with hot pepper flakes, salt, black pepper, smoked paprika and oil. Yes, to get a good char on cauliflower the pieces should be flat, but that’s not the best part. That honor goes to the lime-garlic-cilantro salsa. (Don’t bother making this if you don’t like cilantro.) Fresh avocado provides a contrast in textures and more nutrition. Roasted tofu gives it protein staying power. Pumpkin seeds add even more protein.

1 head cauliflower, sliced and pieced

1 lb of firm tofu, drained, pressed, and marinated in 2/3 soy sauce and 1/2 balsamic vinegar.

about 3 tablespoons of vegetable oil–I used avocado

salt, smoked paprika, black pepper, hot pepper flakes

I bunch cilantro, chopped very coarsely

3 fat cloves of garlic, grated

5 or 6 limes, juiced with some rind grated too if you like

6 ounces of roasted cashews, coarsely chopped

2-4 avocados, diced

pumpkin seeds, optional

  1. Press, cube, and marinate the tofu.
  2. Coat the cauliflower in oil, salt, smoked paprika, black pepper and hot pepper flakes. Start with 1 tsp sea salt and 1 tsp smoked paprika.
  3. Photo above is of the two pans before going into the oven. Contents will shrink a bit during roasting. Roast tofu and cauliflower on separate sheet pans in a hot–400 degree–oven, switching pans half way through and stirring if needed. Both should be done after 25 minutes, but ovens vary. The cauliflower should be tender all the way through and crisp-ish in some places. The tofu should be a bit crusty on the outside.
  4. While cauliflower and tofu are roasting, make the salsa: Juice the limes and grate the garlic into the juice. This will tame the raw garlic flavor.
  5. Chop the cilantro and toss with everything else. Dice the avocados just before putting the salad together. (Or, more trouble, blanch avocados before cutting to disable the enzyme that turns the flesh brown.) Add pumpkin seeds for even more protein and texture. Taste for seasoning–it might need more lime or salt or pepper. I store the salad in the refrigerator with everything except the avocados, and it tastes fine the next day or even the one after that. But best at room temperature. We serve this on a bed of arugula.

Thanksgiving: Easy Pecan Tart

If you love pecan pie, but dislike sugary-gummy filling, try this tart. The frozen puff pastry is a time saver. A layer of unsweetened chocolate cuts sweetness and also gives the tart enough body to eat out of hand, like a cookie. Serves 10-12.

Prepare tart pastry:

Use ½ lb. defrosted but still cold butter puff pastry (half of one Trader Joe’s package; Dufour comes in a 14 ounce package, which means your tart will be slightly smaller). With a bit of flour, roll out more thinly to a  larger rectangle, making the new rectangle approximately two inches longer and two inches wider than the original. Keep the pastry on parchment (re-use the one it came in but turn the pastry so it fits).

With a knife, score  (don’t cut through) a smaller rectangle, creating a ¾ inch-1 inch rim for the tart. Prick the middle all over with a fork. I have in the past taken the trouble to blind bake with pie weights, but it’s not worth it. If the pastry puffs, just prick with a fork or press down with your fingers. You can also do this after you take it out of the oven so you don’t burn yourself. The weight of the filling compresses the pastry.

Bake 15 min at 375 on bottom rack of oven. Since ovens vary so much, keep an eye on it. You want the bottom of the pastry darker than the rest, and the top lightly golden.

While pastry is baking, make the caramel custard filling:

In a small saucepan, whisk 2 egg yolks, 1/4 cup golden or corn or maple syrup, ½ cup sugar,  1 Tbs. molasses, (or 1/2 cup brown sugar, which is just sugar +molasses), 3 Tbs. butter,  ¼ cup heavy cream, ½ tsp salt (if butter is unsalted). Whisk over medium low heat until slightly thickened, about 4 minutes. Add 1 tsp. vanilla extract or 1 Tbs. bourbon. Taste and add a bit more salt if you like. 

Take pastry out of oven when very lightly golden; at this point you can also let it sit until you are ready to resume.  

Scatter pricked part of pastry with 3 ounces finely chopped unsweetened or 85% or more cocoa content bittersweet chocolate. The chocolate makes the pastry more firm at room temperature and it also counteracts the sweetness of the caramel. You can leave it out for a more traditional pecan tart. The photo below was taken before pouring the caramel and baking for a second time. You’ll see the chocolate melting below the pecans.

Cover with 6-7 ounces pecan halves. They can be arranged in a pattern or scattered.

Pour the prepared filling  over the center part of the tart with pecans (and chocolate, if using). If the filling is lumpy, pour through a sieve. Don’t use all the filling if it will run over the edges of the tart.

Bake again at 350 on bottom rack for 15-20 minutes or until filling is bubbling and looks drier and translucent (not necessarily in the middle) and the pastry is darker golden brown. Let cool 30 minutes before serving with whipped cream. The tart stays edible at room temperature for 3 days. It can be warmed a bit for serving, or eaten out of hand at room temperature like a cookie bar.

Green Bean, Walnut, and Feta Salad

This is a salad I’ve been making since 1980, when we served it at 209 1/2. I never get tired of it, and I haven’t seen on other restaurant menus. The combination is bright, fresh, salty, creamy, crunchy, slightly sweet, with just the right amount of acid, provided by vinegar and citrus. But it also contains significant protein, from the three components.

Start by chopping half a red onion. Place the onion in a bowl and add 1/4 cup apple cider or red wine vinegar, a tablespoon of maple syrup, a teaspoon of salt and a teaspoon of pepper. This will quick pickle the onion, muting its bite and enhancing its flavor. Meanwhile, boil a pound of cleaned green beans in salted water–cook until they are softer than you usually make them; in other words, you want them not to resist your bite but to absorb the flavors of the salad. Start testing at four minutes–it might take six minutes. In our fervor not to overcook green vegetables, we overlook the instances when “crisp” is not desirable. Put the drained, warm, green beans in the bowl with the pickled onions. Toast a cup of walnut pieces or halves until fragrant (try 7 minutes at 350 degrees) and add, with about 8 ounces of drained feta cheese. (If you want to make the dish vegan you could substitute crumbled tofu, marinated in soy and balsamic, for flavor). If you use feta, it’s worth it to buy imported sheep feta, which has a tang and is creamier than domestic feta made from cow’s milk.

Correct the flavors with fresh lemon juice (try 1/2 lemon) and or a good dash of TruLemon powder, and olive oil, at least 1/3 cup. Add chopped parsley, dill, mint, or tarragon for finesse. The salad lasts at least four days in the refrigerator. You can serve it on a bed of lettuce if you like.

Snow Cap Cookies, Variable and Adult

Over the many years I’ve made these cookies, which are sometimes called “crinkle” because of the cracks, I often changed the ingredients, and the cookies were always delicious. I made them gluten-free, using sweet rice flour/tapioca starch or chestnut flour (which is sweet, so you have to cut the sugar). I made them dairy-free, using coconut oil. I made them vegan, using coconut oil and flaxseed eggs (1 Tbs. ground flaxseed mixed with 2.5 Tbs water.) I used Dandy Blend (ground dandelion, chicory, and beetroot) instead of instant coffee. Most recently, when I found a package of organic Ecuadorean cocoa mix (excellent! of course I tasted it) on our apartment building’s thrift table, I subbed that for the cocoa and the sugar. The recipe withstands these changes, I think, because the chocolate is dominant. My go-to is 72% Pound Plus from Trader Joe’s, but I have also used unsweetened chocolate and increased the sugar. You could use sweeter chocolate ( say 55%)and eliminate the sugar from the recipe (but not the molasses, because it adds a certain chew and bitter edge). The percentage refers to the cocoa solids–the higher the number, the less sugar.

Many recipes lurk out there (including, quelle horreur, one that uses boxed cake mix and whipped nondairy topping) and you may even find the cookies in supermarkets. Below is a recipe with variations that I hope won’t disappoint. I think of it as “adult” because of the bitter complexity created by the molasses and coffee. But because the sugar coatings are the first thing your mouth tastes, they initially seem sweeter than they are, and while the texture resembles fudge, the taste does not. Cold, they are chewier than at room temperature.

8 ounces 72% chocolate, chopped and melted (I use the microwave– stir after a minute, letting residual heat melt any chunks, microwave again for 20 seconds if there are many unmelted pieces)

4 ounces butter (one stick) or coconut oil

2 Tbs. molasses

1/2 cup sugar (you can substitute brown sugar for the sugar and molasses–I don’t buy brown sugar because it it is just white sugar with molasses added; if you are using sweeter chocolate (lower cocoa solid number), cut back on the sugar).

2 eggs (or flaxseed variation)

1 cup flour (all purpose, chestnut, g/f blend, etc.) If using sweet rice flour (2/3) and tapioca starch (1/3) they should together weigh 4 ounces. If using chestnut flour, reduce the sugar by half.

1/2 cup unsweetened cocoa powder (alkalinized or not)

2 Tbs. instant coffee or Dandy Blend or espresso powder

2 tsp. baking powder

1/4 tsp salt (omit if using salted butter)

granulated and powdered sugar, for coating

I make the dough in a food processor, but you can also use a mixer.

Cream the fat, sugar, cocoa, coffee. Add the eggs, then the flour and finally the melted chocolate. At this point you can scrape out the dough and turn it into a plastic-wrapped package for chilling and then cutting into squares (which can then easily be rolled into balls), or you can just put the container in the refrigerator for about 30 minutes. Yes, the outside will chill faster than the middle, but I can live with that, with the bit of mess it makes to create balls of dough and roll them first into granulated and then into powdered sugar.

At this point, if your kitchen is warm, you can chill the balls of dough right in the bowl of powdered sugar. If the balls are holding their shape, place them on a parchment-covered cookie sheet toward the top and middle of the oven and bake at 325 for 9-10 minutes. As soon as they are puffed and spread, take them out. (One has to be careful not to overbake recipes with chocolate!) Allow to cool before moving into tins or a plate or eating. (The chocolate will cool and will provide stability.) I’ve kept these for a month in my refrigerator, and I suspect the vegan version will keep even longer because coconut oil is more stable than butter.